Computers are perhaps the most significant invention of the 20th century. Most companies and individuals rely on them. We tend to perform simple tasks to life changing ones from writing a multi billion dollar proposal to simple ones like sending an email and this entirely end up being saved on a computer hard disk. With such activities on your pc could probably encounter some sort of malfunction or hiccup that causes you to either lose productivity or worse, all your work.
To avoid such incidence Microsoft Windows XP was created with a program called Windows XP Back Up application. This can help you to backup all your data and save you from the expensive recovery process. Safely store your data and be retrievable should your hard drive crash -- though if you have corrupted data, this option may not be as helpful.
Get Started
Before you can even think about creating a backup, you have to get your files in order. This doesn't mean you need to rearrange every file in every folder. Just check to make certain all your essential data files are stored in one easy-to-find location.
Windows XP makes this task especially easy by giving every user account its own personal profile, which consists of a set of subfolders in the Documents and Settings folder. Your profile holds your personal files. If you have personal data stored elsewhere, consider moving it into the My Documents folder to make backing up easier. If you're unwilling or unable to move those files, make a note of where they're located so you can be sure you add them to your backup set later.
1. Click Start -> All Programs -> Accessories -> System Tools, and then click Backup to start the wizard.
2. Click Next to skip past the opening page, choose Back up files and settings from the second page.
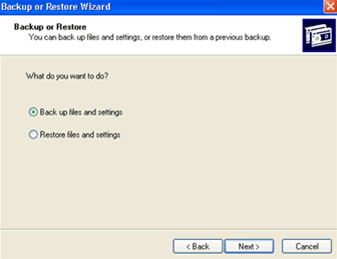
then click Next. You should see the page shown below, which represents your first decision point.

Decide What to Back Up
- Click All information on this computer if you want to back up every bit of data on your computer. Think twice before choosing this option, however. If you've installed lots of softwares, your backup could add up to many gigabytes.
- The My documents and settings option is a better choice. This selection preserves your data files (including e-mail messages and address books) and the personal settings stored in the Windows Registry.
- Select Everyone's documents and settings If several people use your computer—as might be the case on a shared family PC—. This option backs up personal files and preferences for every user with an account on the computer.
- Go for Let me choose what to back up If you know that you have data files stored outside your profile, click. This option takes you to the Items to Back Up page shown figure below
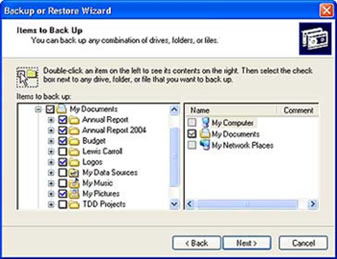
Select the My Documents check box to back up all the files in your personal profile, and then browse the My Computer hierarchy to select the additional files you need to back up. If some of your files are on a shared network drive, open the My Network Places folder and select those folders.
This option also comes in handy if you have some files you now you don't want to back up. For instance, I have more than 20 GB of music files in the My Music folder. To keep my data file backup to a reasonable size, I click the check box next to the My Music folder. This clears the check box from all the files and subfolders in My Music.
Decide Where to Store Your Backup Files
On the Backup Type, Destination, and Name page, Windows asks you to specify a backup location. If you're one of those exceedingly rare individuals with access to a backup tape, the Backup utility gives you a choice of options in the Select a backup type box. No tape drive? No problem. Backup assumes you're going to save everything in a single file; you just have to choose a location for that file and give it a name.
By default, Backup proposes saving everything to your floppy drive (drive A). Although that might have made sense 10 years ago, it's hardly a rational choice today. You'd need dozens, perhaps hundreds of floppy disks to store even a modest collection of data files, especially if you collect digital music or photos.
Instead, your best bet is to click Browse and choose any of the following locations:
- Your computer's hard disk. The ideal backup location is a separate partition from the one you're backing up. If your hard disk is partitioned into drive C and drive D and your data is on drive C, you can safely back up to drive D.
- A Zip drive or other removable media. At 100-250MB per disk, this is an option if you don't have multiple gigabytes to back up. Unfortunately, the Windows Backup utility can't save files directly to a CD-RW drive.
- A shared network drive. You're limited only by the amount of free space on the network share.
- An external hard disk drive. USB and IEEE 1394 or FireWire drives have dropped in price lately. Consider getting a 40 GB or larger drive and dedicating it for use as a backup device.
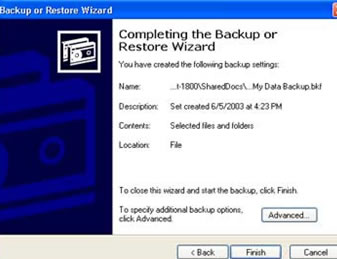
After you've chosen a backup location, enter a descriptive name for the file, click Next to display the wizard's final page, as shown in Figure 3, and then click Finish to begin backing up immediately.
Set a Schedule—and Stick to It
If you're disciplined enough, you can repeat the above steps once each week and perform regular backups when you're ready. If you'd rather not count on remembering to perform this crucial task, however, set up an automatic backup schedule for Windows. When you get to the final page of the Backup Wizard (see Figure below), don't click Finish. Instead, click the Advanced button, and click Next to open the When to Back Up page. Choose Later, and then click Set Schedule to open the Schedule Job dialog box shown below.
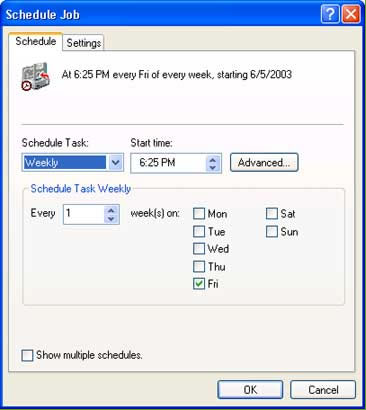
This example shows the settings for a weekly backup on Friday afternoon—a good way to make sure your week's work is protected. But you can set almost any schedule you want by poking around in the extensive set of options available in this dialog box. After you click OK to save your changes, Windows XP runs the backup automatically. Just remember to leave your computer turned on.
From Joe
Intrusecurity
