Before I unleash the cool steps of configuring a belkin router, I must inform you that I carried out my experiments with an old version of belkin “Wireless G router”. But right now on market we have quite a number of new versions of a belkin wireless router.
Step 1: Get yourself a UTP Ethernet cable; plug your router into power (ofcourse I know you know this…right?).
Connect your Ethernet cable into any of the 4 LAN ports on the wireless router.
Configure your laptop with an IP Address “192.168.2.2”.
NOTE: The default configured network on the Belkin router is “192.168.2.0/24” and the belkin router has an IP Address of 192.168.2.1 by default.
Step 2: Type the router’s IP Address into the web-browser as http://192.168.2.1/ , ofcourse press Enter. You should be able to receive something like shown in Figure 1 below:-
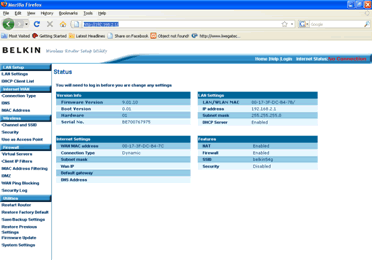
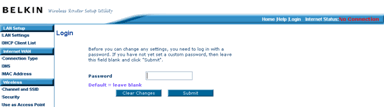
Then click on the Login button on the Right Hand Side – Top Corner of the open belkin page as shown above.
NOTE: By default Belkin wireless routers have no password so when you click on login just click on Submit without entering anything in the password section.
You should be returned to a more detailed page showing you a logout button.
Ooh before I forget. Incase the router was once configured and it has a password. I suggest move to Step 2b. Resetting a Belkin Wireless router. Otherwise continue with step 3 to configure the router.
Step 2b: Resetting a Belkin Wireless router to default settings.
- Get a pin or use a lead of pen or anything small to fit into small hole.
- Look at the back or bottom of your belkin router, the small button that reads Reset.
- Press, and hold, the Reset button down for 30 seconds.
- Wait for your Power, WLAN and Internet light to turn on. (On the router)
NOTE: When pressing the Reset button down make sure you don't release the button until you are sure it has been compressed for 30 seconds or more.
Step 3: Internet WAN.
Now I have my reason why I like starting with configuring internet WAN instead of LAN setup option. This is because I always want to make sure I can have internet with existing LAN settings (default IP address for the router). I also recommend you start with internet settings on the router. So here we go.
Under internet WAN, choose Connection type.
NOTE: You should be aware of the connection type you have from your internet service provider, if not sure please contact them ASAP.
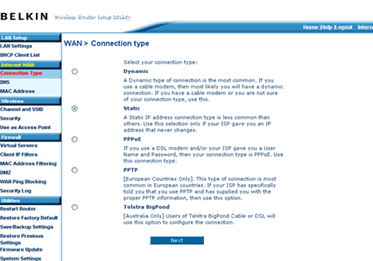
In my case I will use static option and I have already clicked it. After click the NEXT button. You should have a screen as shown below:-
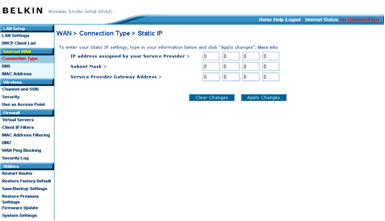
Enter the IP addresses as provided to you’re by your ISP then apply changes. After a few seconds your router should change to connected status as shown below:

Why half image? Sorry guys, am not ready to reveal my public IPs to the world.
Step 4: Configuring DNS
Untick “Automatic from ISP” option.
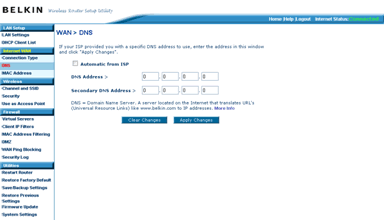
Enter the DNS IP Addresses as provided to you by your service provider and apply.
At this point you should be able to surf internet. I assume that you provided your computer the following IP Addresses: (IP: 192.168.2.2 SM: 255.255.255.0 GW: 192.168.2.1) and the DNS IPs from your service provider.
Step 5: Configuring wireless settings.
Enter SSID (Name of your wireless router), Protected Mode: Enable protection

Step 6: configuring wireless security
At this stage in the wireless router. There 4 protocols you can choose from to configure your security. Well I prefer WPA2 since is the most secure 128-bit encrypted key. You have even an option of providing guests internet only. Cool huh!!!

NOTE: Make sure the password assigned to the router is above 8 digits and to make it more secure have a password mix of words and digits for example “b0b@dm1N” such a password is hard to crunk.
Please avoid using dictionary or your families names directly for password
Wireless > Use as Access Point: You can activate this option if you want to use this router as access point. Picking internet from your server on the LAN. Basically with this option you can use it to have both a wired and wireless LAN.
Step 7: Configuring LAN settings.
In this section you can decide to change the LAN IP say from default to another one you want the choice is yours.
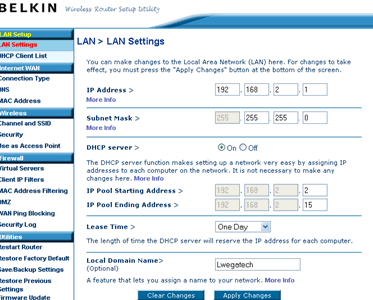
In the LAN Setting section I recommend the following;-
- Always enable DHCP with ONLY the required IP Addresses. Say if you have like 5 people in your home; allow atleast 7 IP Addresses to be given out.
- Always use the right Domain name “Local Domain Name”
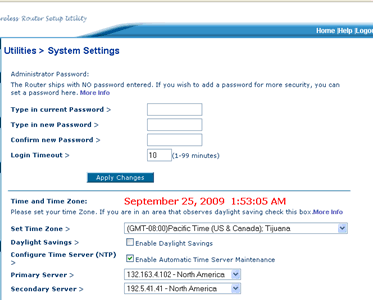
Step 8: Configuring Router Password:
This feature is very important in router configuration. Always set a password onto your wireless router to avoid security issues.
The default password is always blank (no password). Then enter your password that is strong enough, you can easily remember and yet not easily hacked. Then click Apply.
Set Time to your countries’s Time Zone settings for example am in East Africa and we follow the Nairobi time zone.
Remote Management option: Always type in an IP Address you want to carryout remote management of this router. Then save the settings.
If you have followed the above steps very nicely then you will live to enjoy the passion of mobility within your confort either in office or home.
Just a tip of advice ………… do the following:-
- Save all your details like passwords, IP Addresses and others that you have just configured into a notepad or doc and keep them in very safe place to avoid looking stupid the next time you want to use them.
- Place your wireless router to a position very flexible to your movements and work area. Say if you’re to have this device into the lobby room or sitting room or study room make sure it’s a place that can be able to provide a signal all-over your home or office.
Ok incase you get any problem in your configuration just send us an email will be more than happy to help you or login into the forum and post your questions.
By This email address is being protected from spambots. You need JavaScript enabled to view it.
Lwegatech Limited
